Assignment Guide
Overview
This article provides a comprehensive overview of assignments in AE-Connect. The guide includes detailed information on the following topics:
- Way to add an Assignment
- Creating an Assignment
- Grading an Assignment
- Extra Credit
- Editing an Assignment
- Adding/Removing Students from an Assignment
- Special Marks for Grading
- Missing Assignment
- Duplicating an Assignment
- Deleting an Assignment
VIDEO GUIDE topics 1-10
The topics above are hyperlinked for easy navigation within the page.
1. Ways to Add an Assignment
AE-Connect allows users to create assignments in multiple areas. In each location, assignments are added using the Action menu (+).
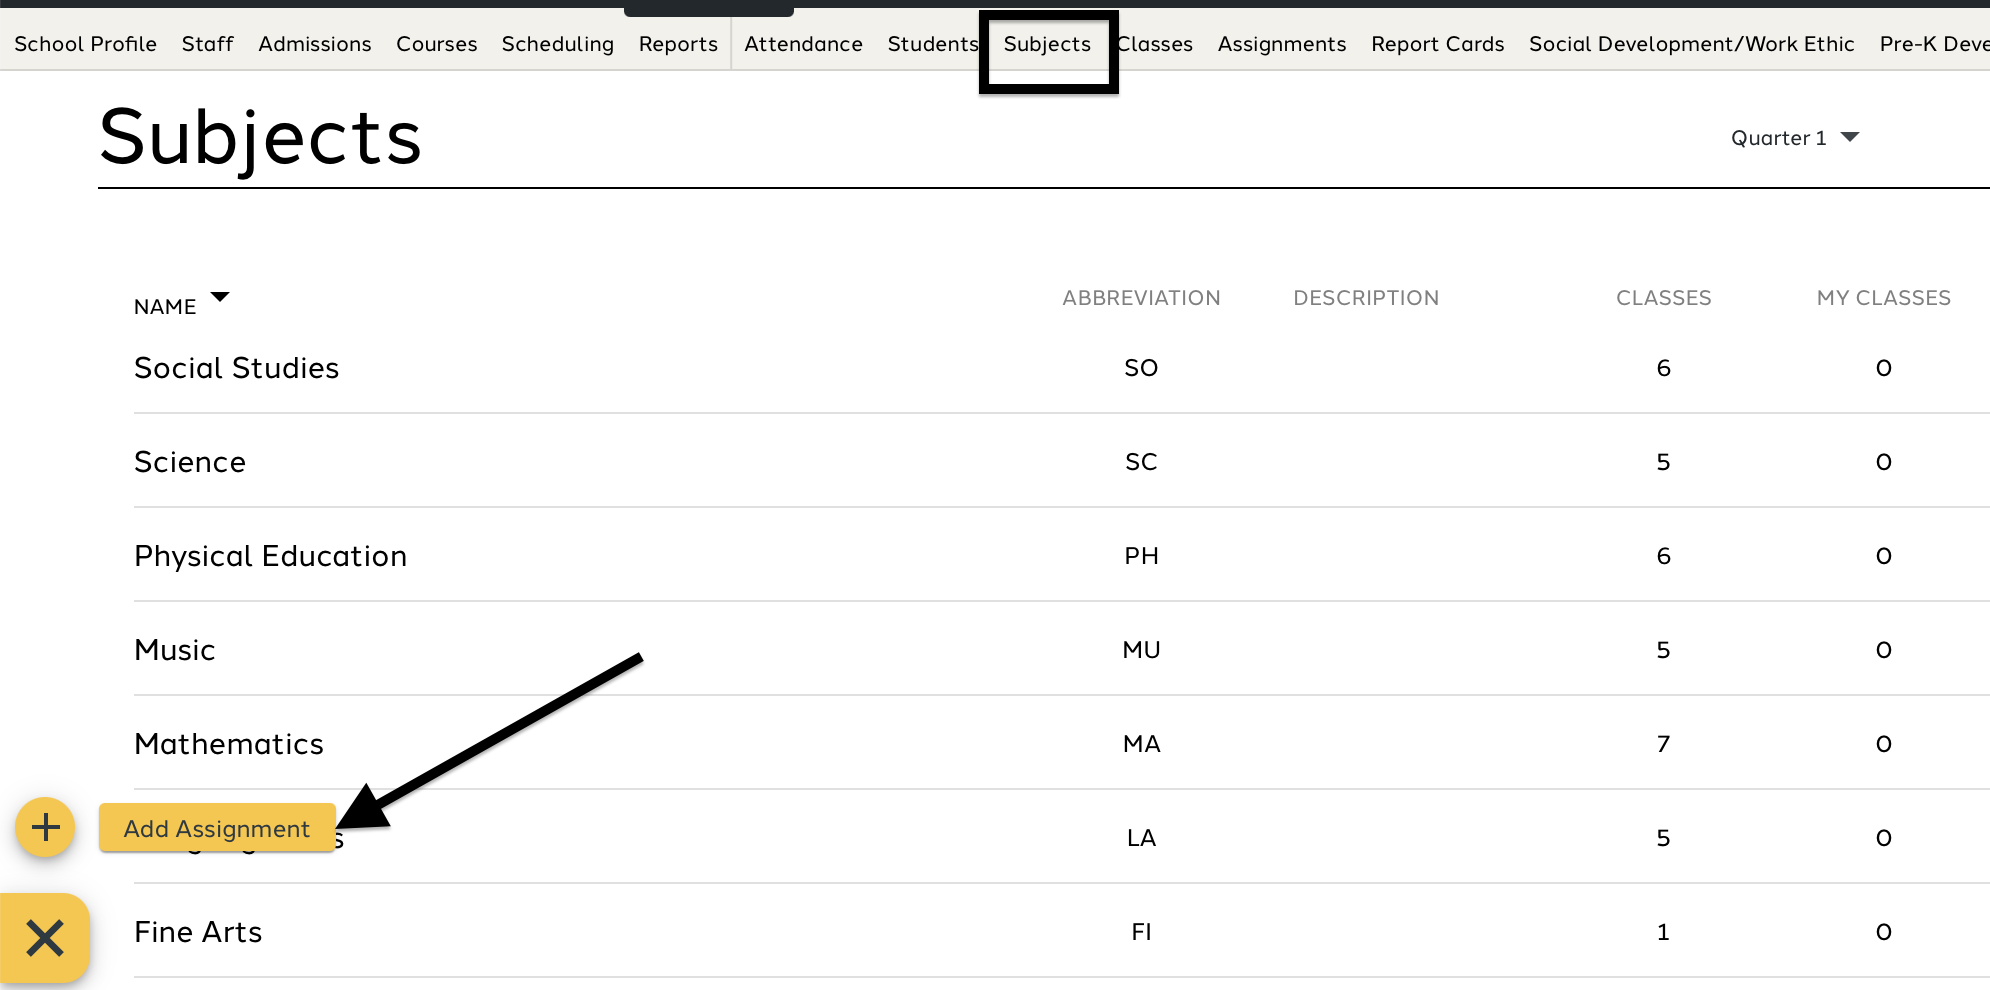
SUBJECT LIST
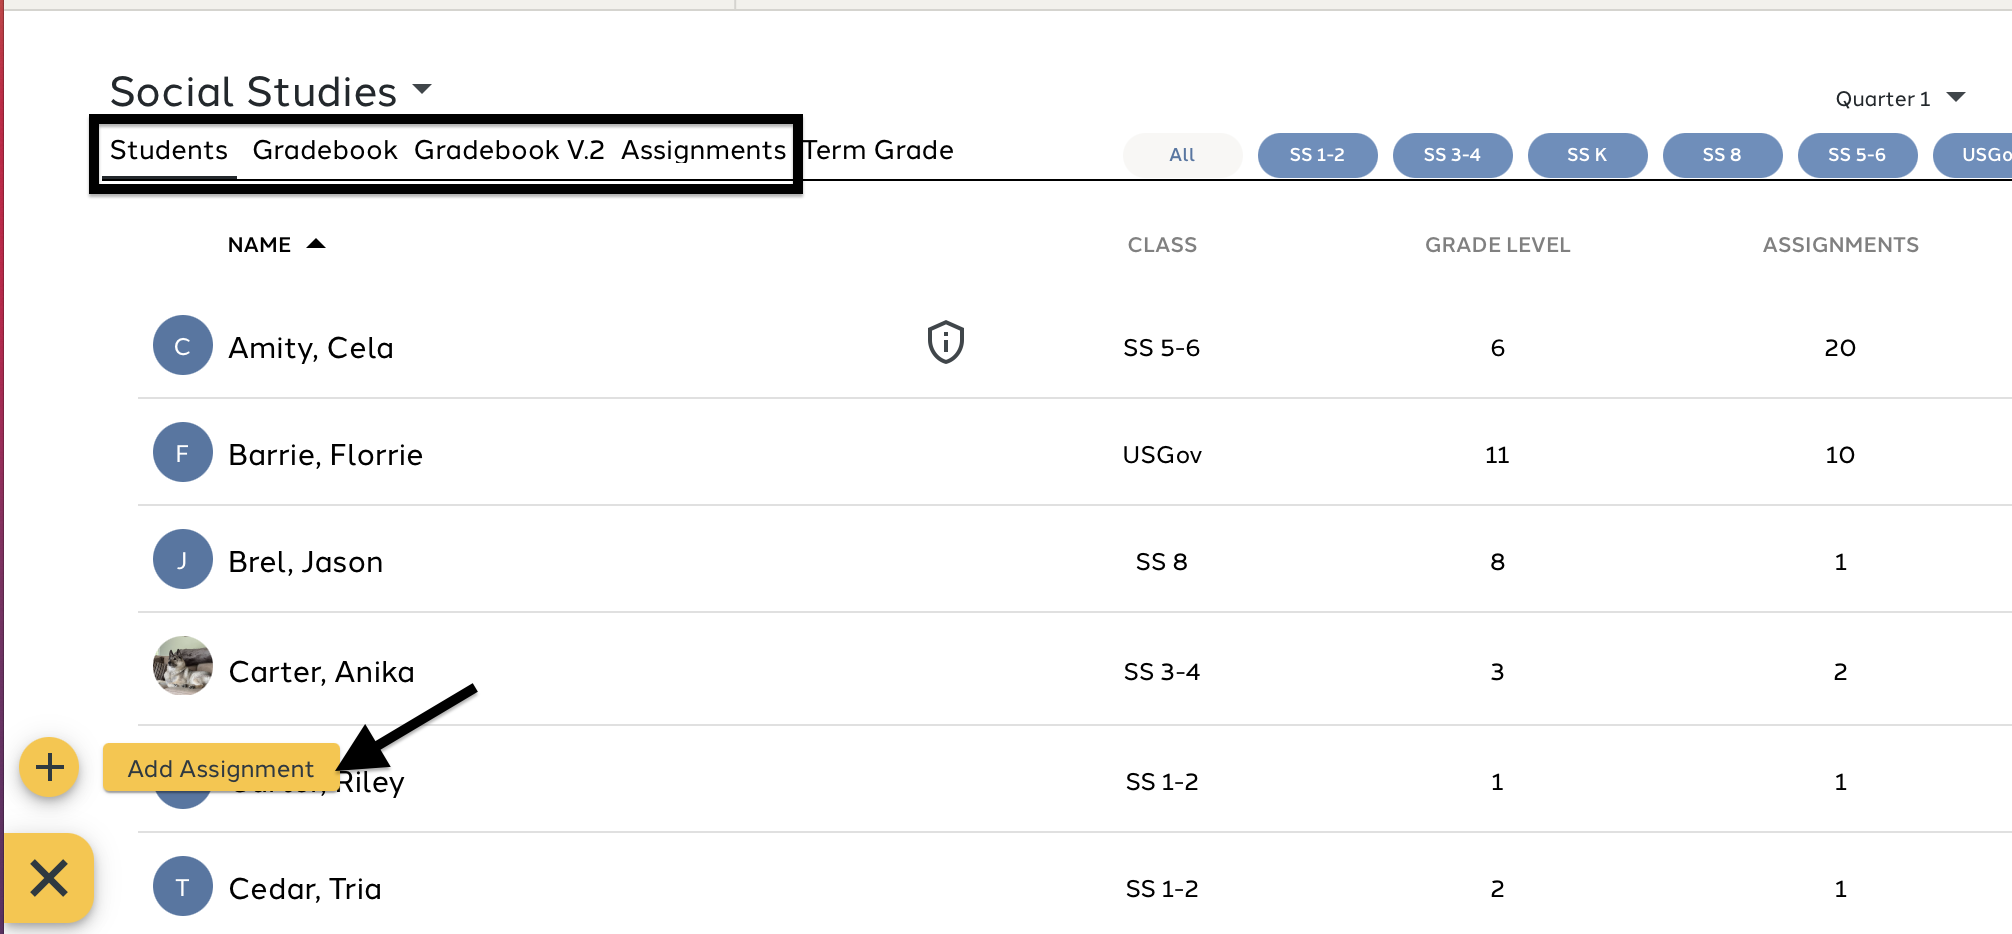
SUBJECT VIEW (under students, gradebook and assignments)
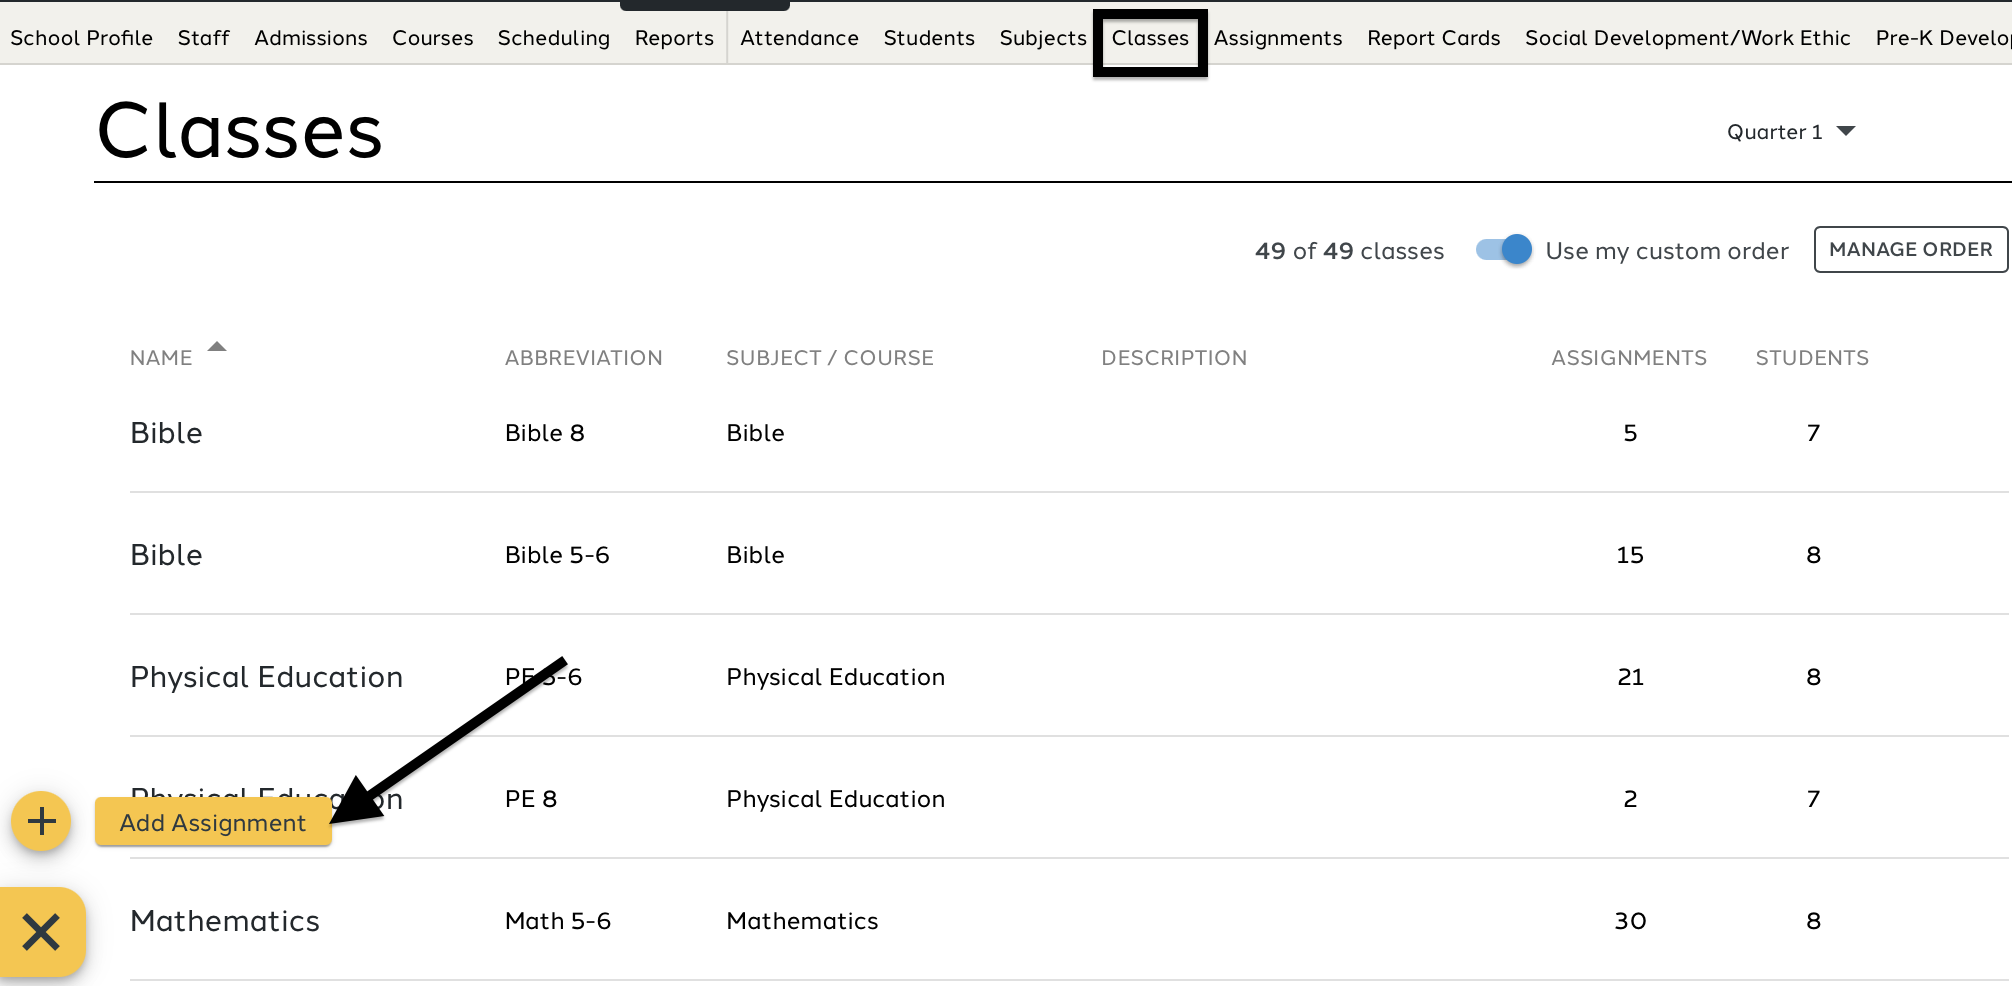
CLASS LIST
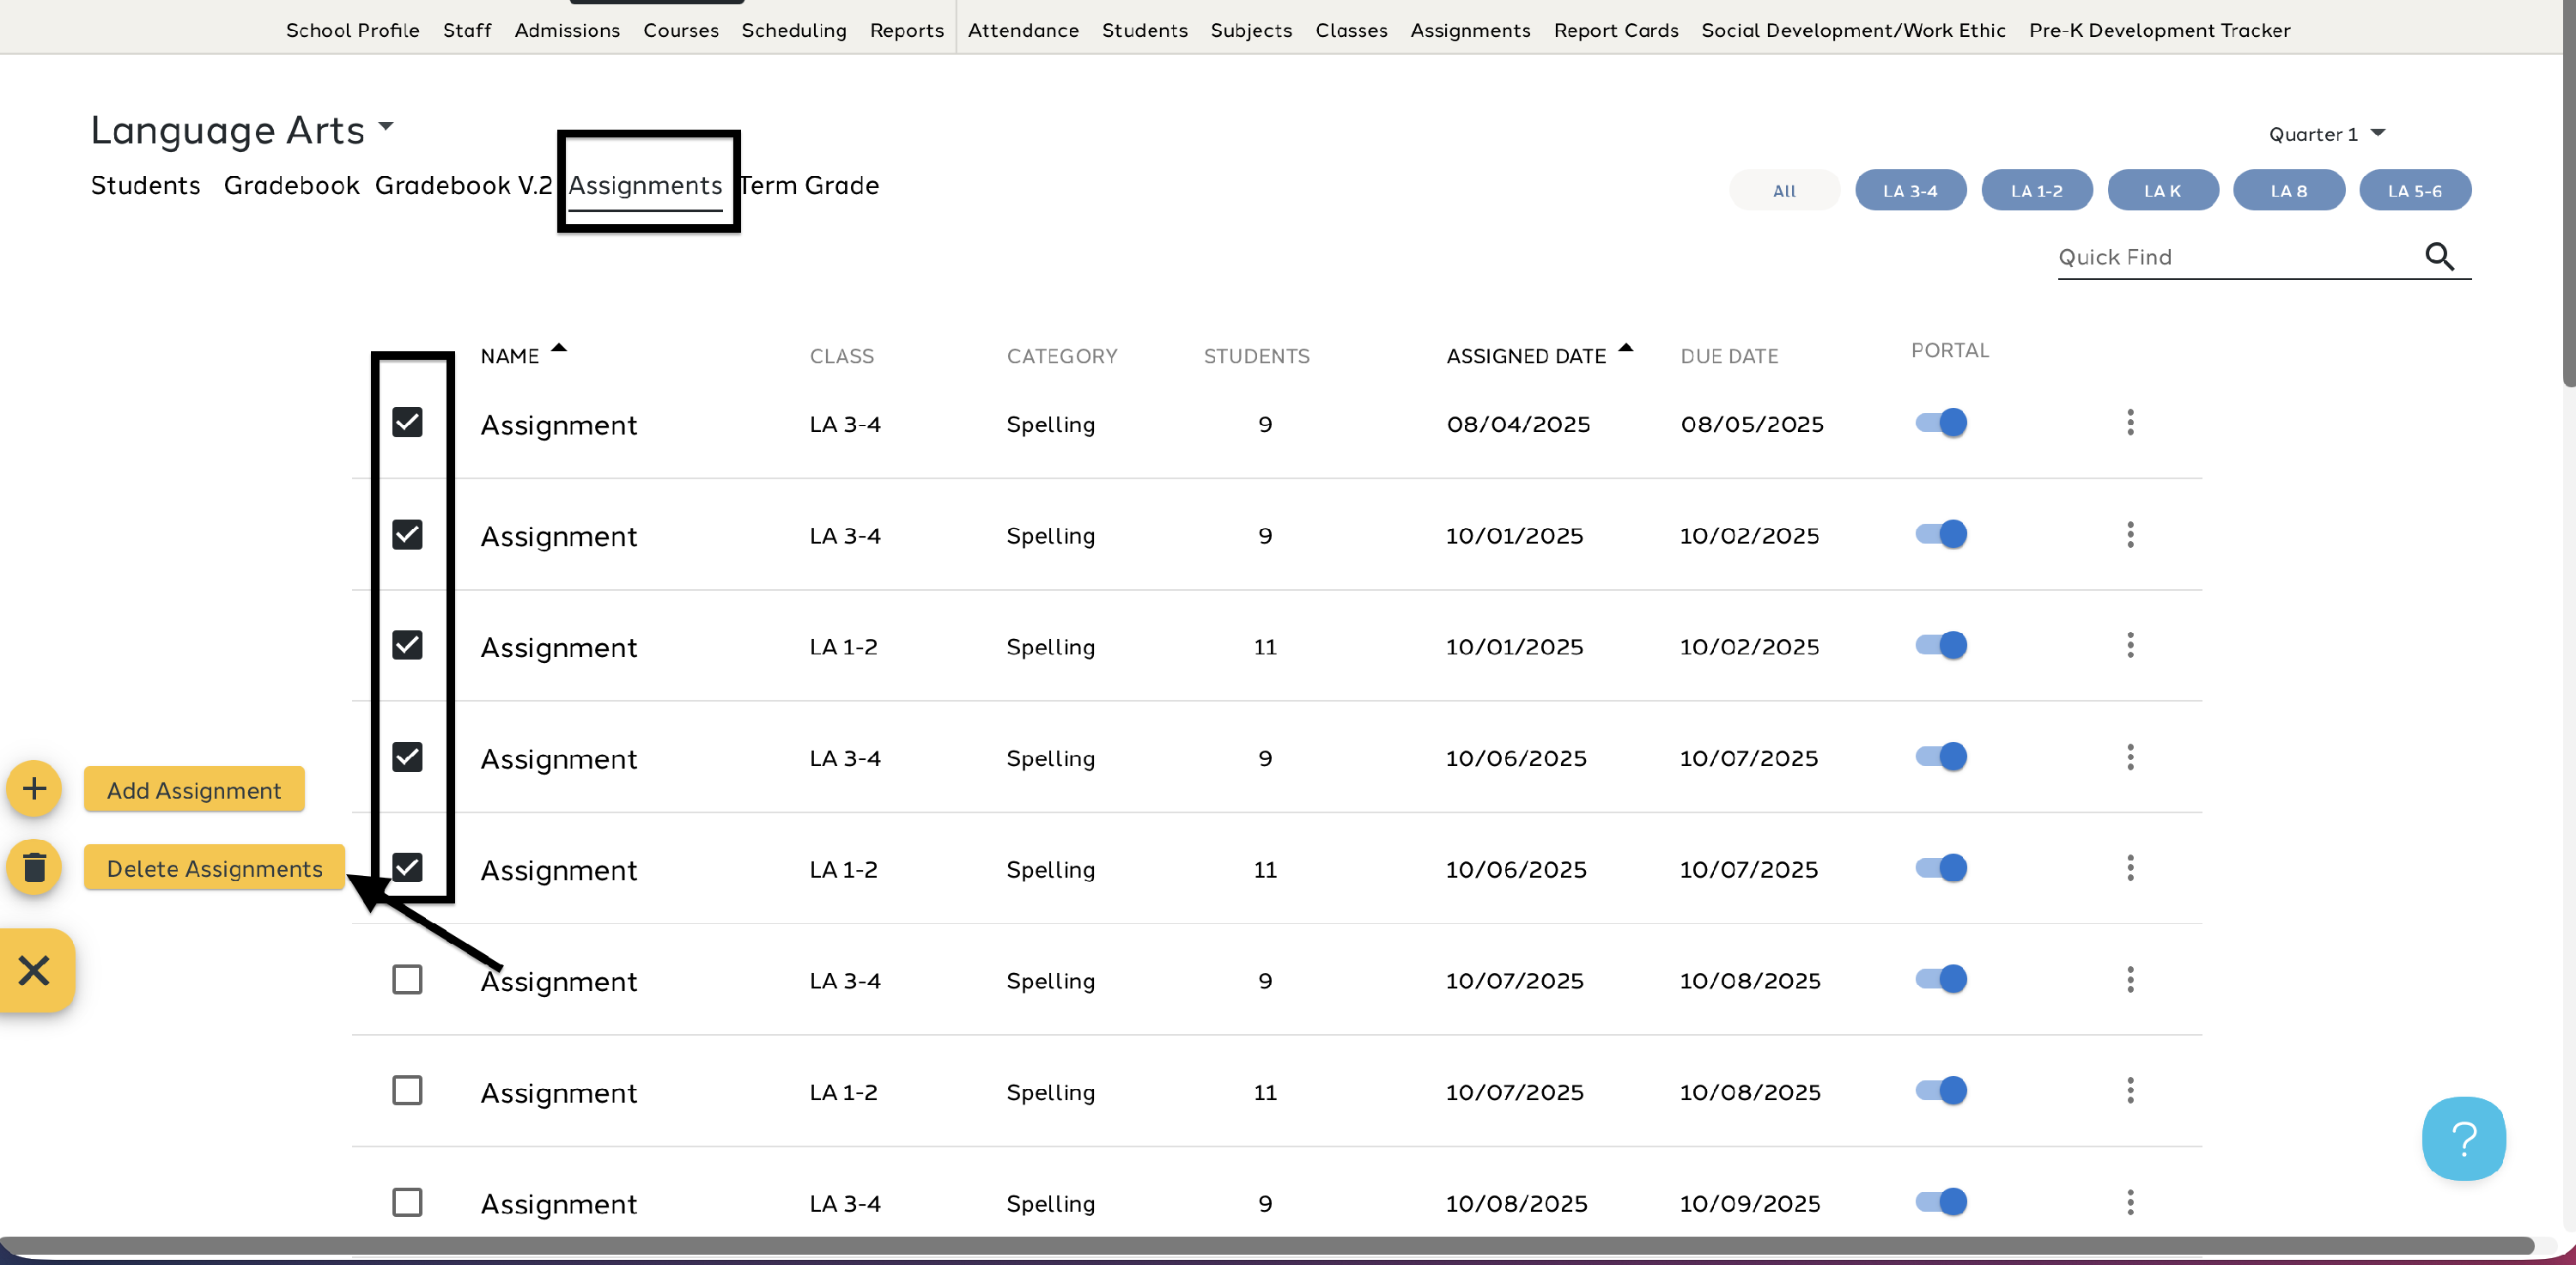
ASSIGNMENTS
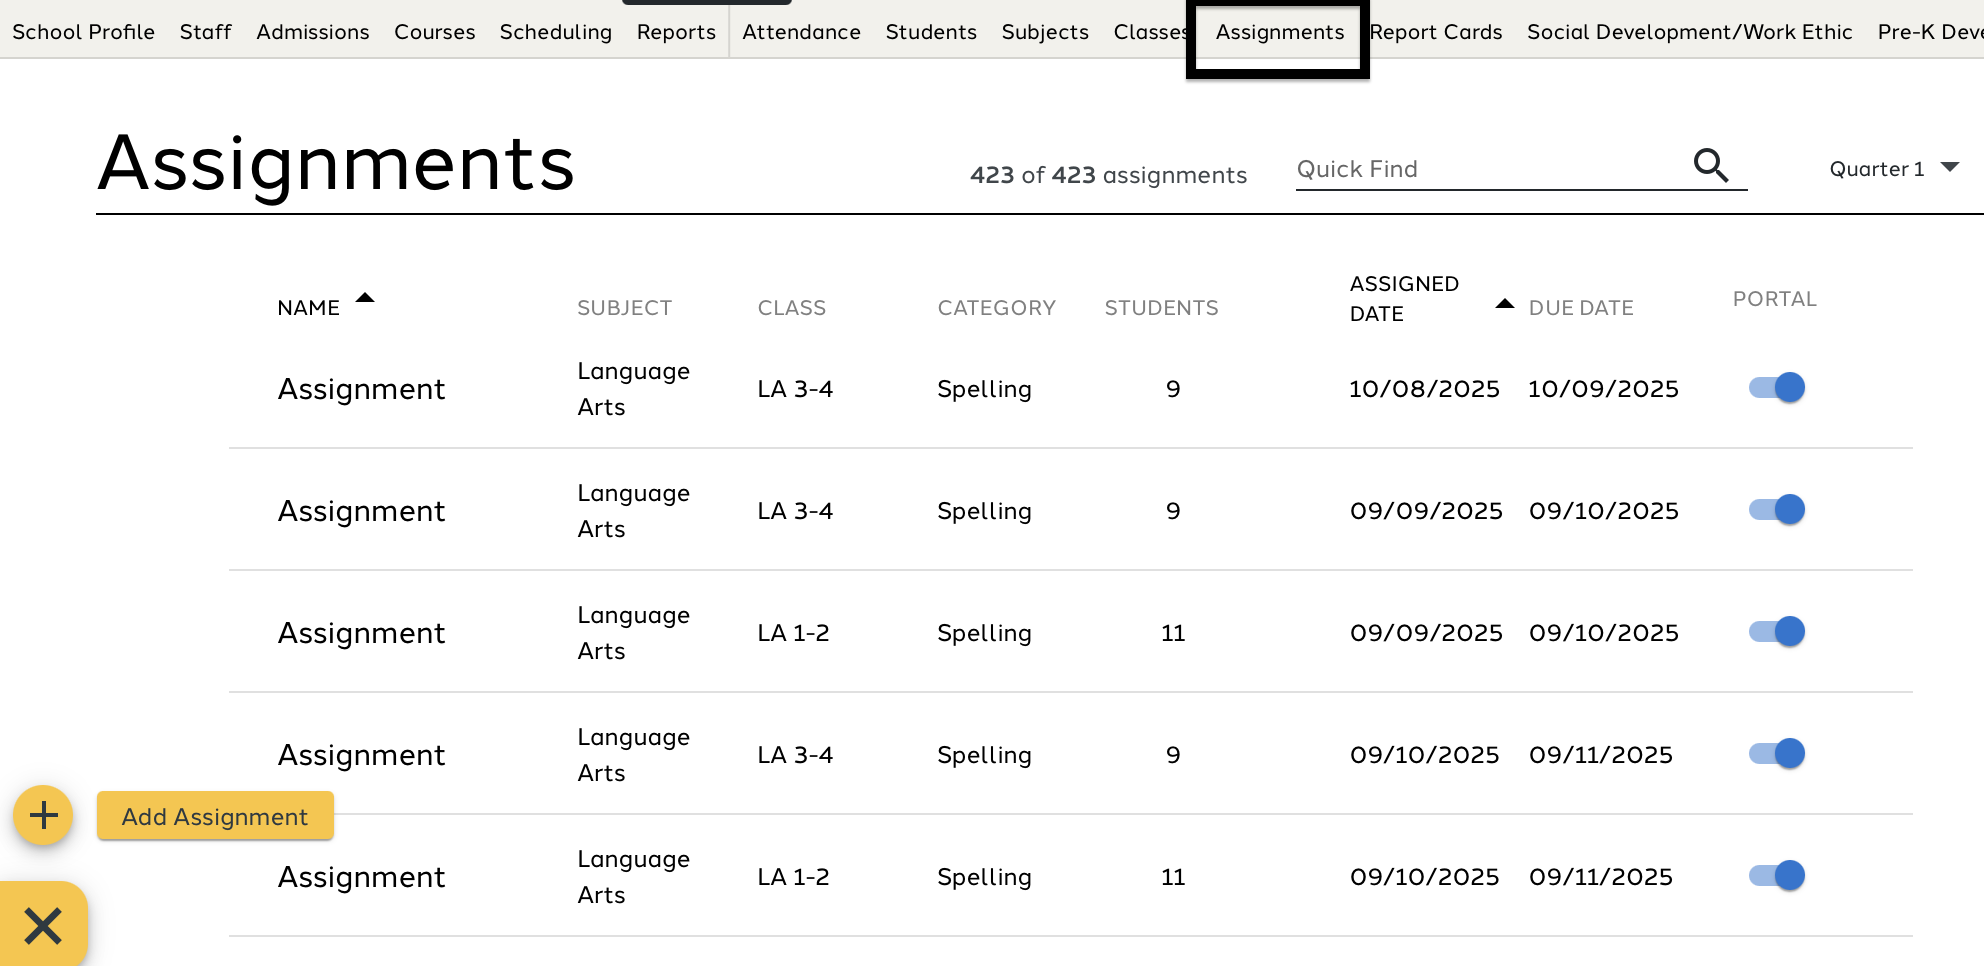
2. Creating an Assignment
After selecting + Add Assignment, the Assignment Flyout opens, allowing the user to create an assignment for one or more classes in AE-Connect.
When an assignment is added to a class, it is automatically assigned to all students enrolled in that class. Users can remove individual students afterward if needed. For details, see “Adding/Removing Students from an Assignment”under the Editing an Assignment section of this guide.
Upon opening the Assignment Flyout, the user can complete the required and optional fields to create the assignment:
Required Fields
- Name of Assignment
- Assign Date
- Class Selection (at least one class must be selected)
- Category Selection (categories depend on the selected class)
- See guide for more information on Class Categories
- Input Options: Letter Grade, Points, or Percentage
- Defaults based on Class setup. The teacher can change each assignment they create.
- Maximum Points (required only when grading by Points)
- Category Selection (categories depend on the selected class)
AE-Connect supports two grading types: percentage-based or points-based. See the Grading Options guide for more details.
Optional Fields
- Description
- Visible to students and parents in portals.
These optional fields become relevant when students access the Student Portal or when the option “Allow student to turn in assignment online” is enabled.
- Due Date
- Assigned Date/Time
- Due Date/Time
- Attachment
Online Student Assignment Submission Options
If “Allow student to turn in assignment online” is selected, the teacher may choose:
- Upload File
- Link
Students will then be able to submit their work through the Student Portal. Teachers can view uploaded submissions directly in the Assignment view.
Display on Student and Parent Portal
Assignments can be shown or hidden from the Student and Parent Portals using the Display toggle:
- Blue = visible
- Grey = hidden
This can be set during assignment creation or edited later.


Saving Assignment
Save and Open
- Available only when adding to one class.
- Opens the assignment immediately for grading.
Save
- Available when adding to one or more classes.
- Assignment appears in the Assignment List or Gradebook.

3. Grading Assignment
Assignments can be graded using Points, Percentage, Letter Grade, or Special Marks, depending on how the assignment was set up.
Access grading through the Subject, Class, or Assignment section..
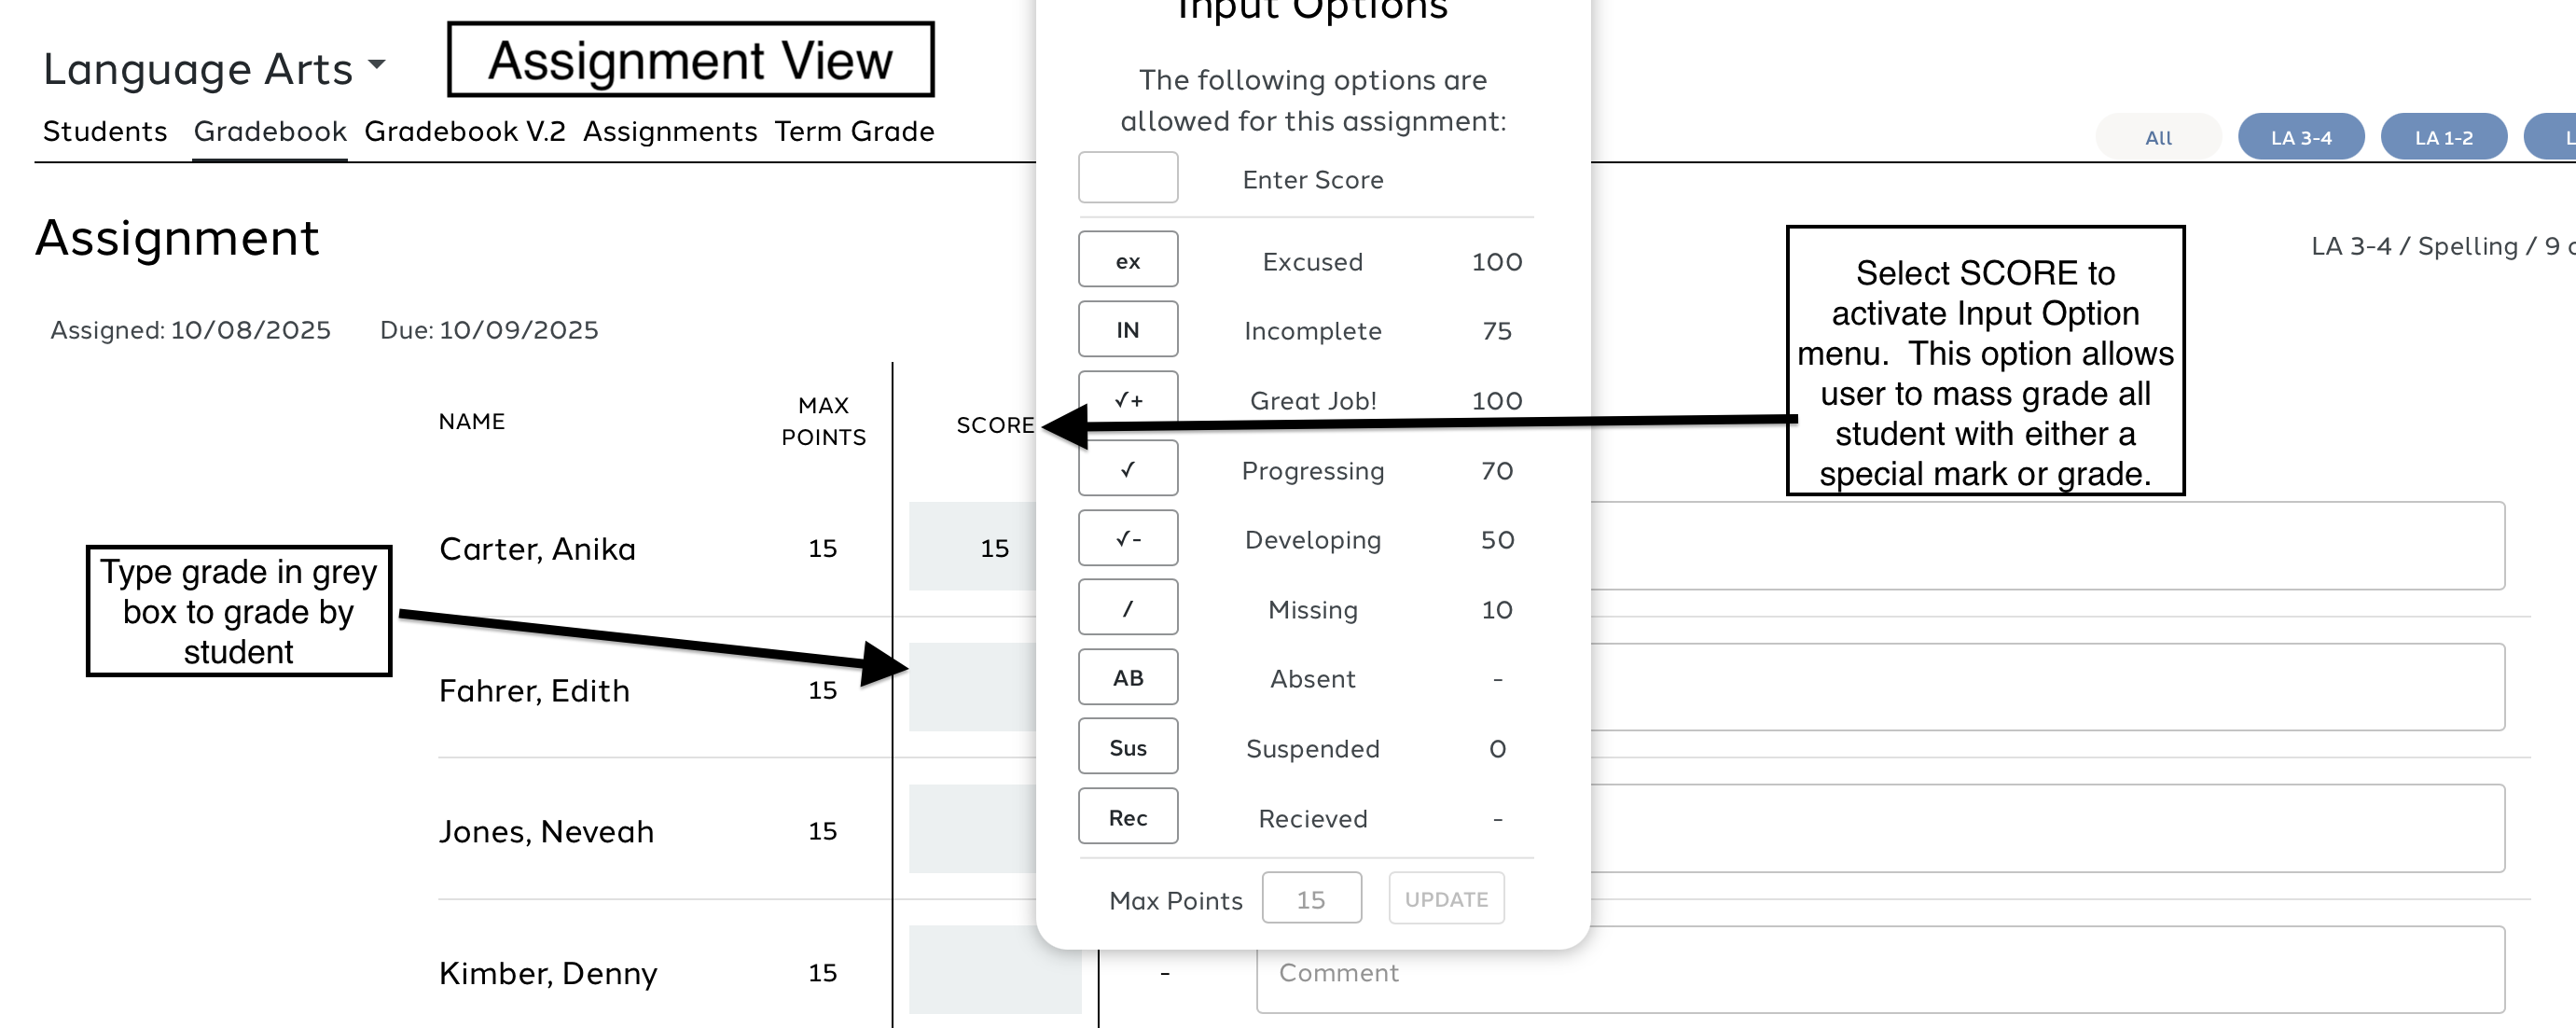
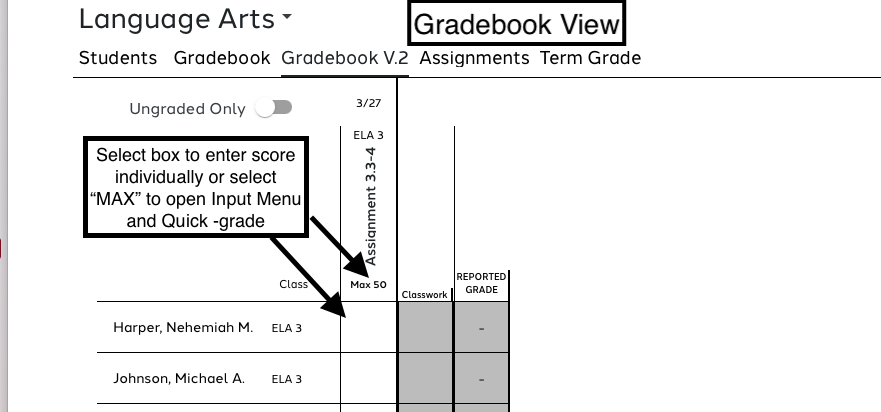
Grading by Points
- Maximum points appear next to each student (or under the assignment title in Gradebook view).
Users may:
- Enter scores individually, or
- Use Score (assignment view) or Max (gradebook view) to set a score for all students, then adjust individually.
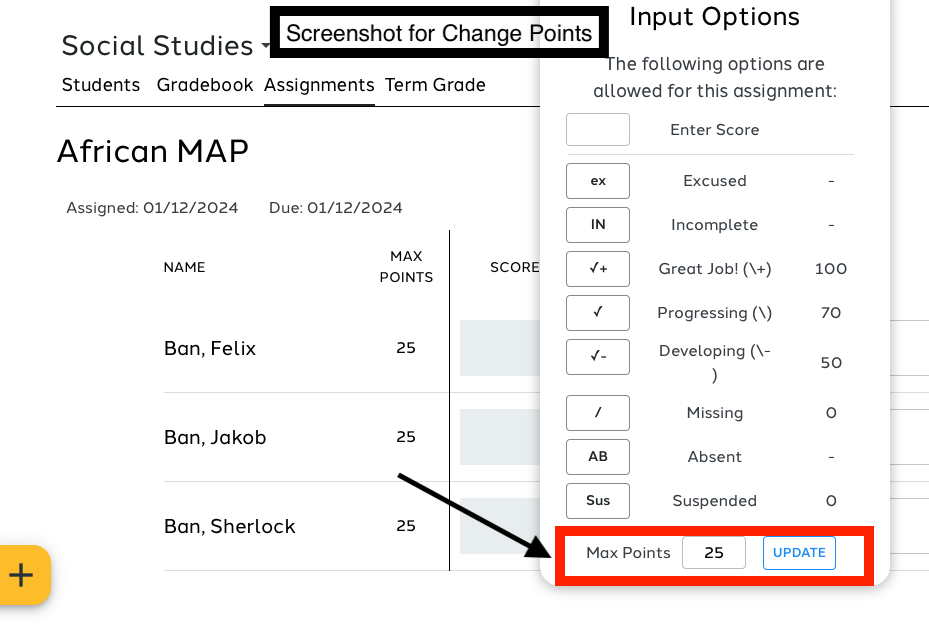
Adjusting Maximum Points
Users may change maximum points only if no grades have been entered.
To update:
- Select Score or Max.
- Enter the new value under Max Points.
- Select Update.
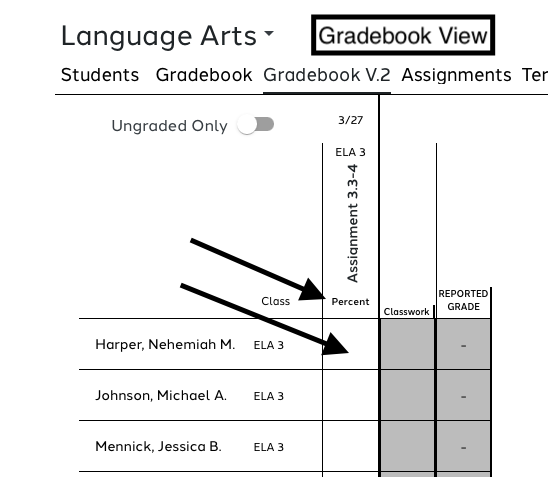
Grading by Percentage
- Users can:
- Enter percentage scores individually, or
- Use Score (assignment view) or Percent (gradebook view) to assign the same percentage to all students
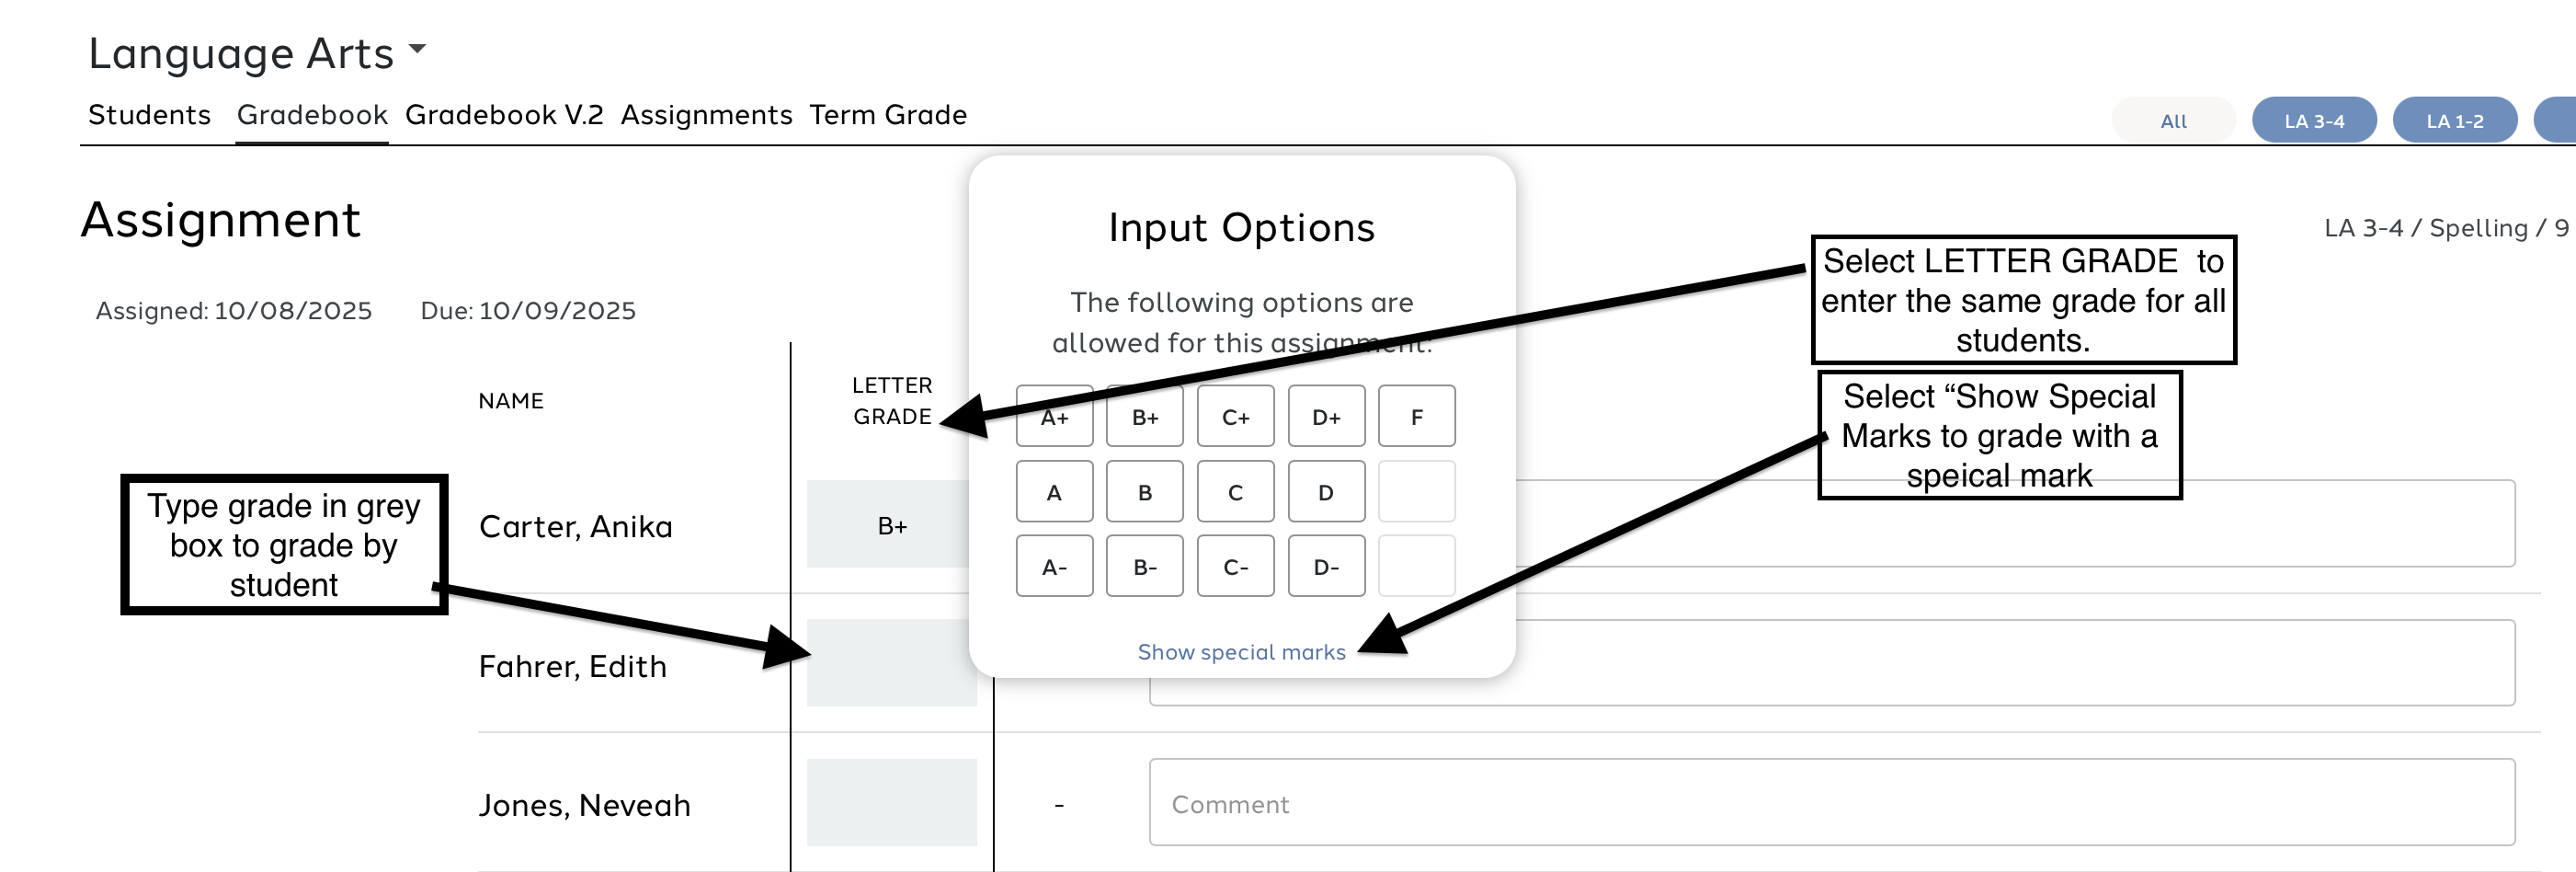
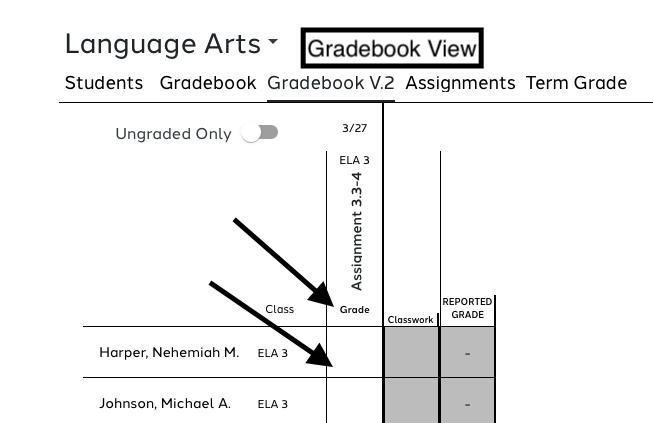
Grading by Letter Grade
- Users can:
- Enter letter grades individually, or
- Use Letter Grade (assignment view) or Grade (gradebook view) to assign the same letter grade to all students.
- Users may also select Show Special Marks to use Special Marks for grading.
4. Extra Credit
Extra credit can only be given on assignments graded by points or percentage.
Two methods:
- Give the student more points/percentage than the maximum.
- Create a separate assignment for extra credit, then remove students who should not receive it.
Assignments cannot have zero points.
Examples:
- A 10-point assignment: a student earning 2 extra credit points would receive 12 points.
- A percentage-based assignment (100%): a student receiving 20% extra credit would be assigned 120%.
5. Editing an Assignment
Users have the ability to edit assignments. Assignments can be edited in the Assignment Screen, Class list or when viewing the assignment. The user can edit most of the properties of an assignment.
IMPORTANT: Once an assignment is graded the Input As option cannot be changed. The user must remove all grades and then change the Input as.
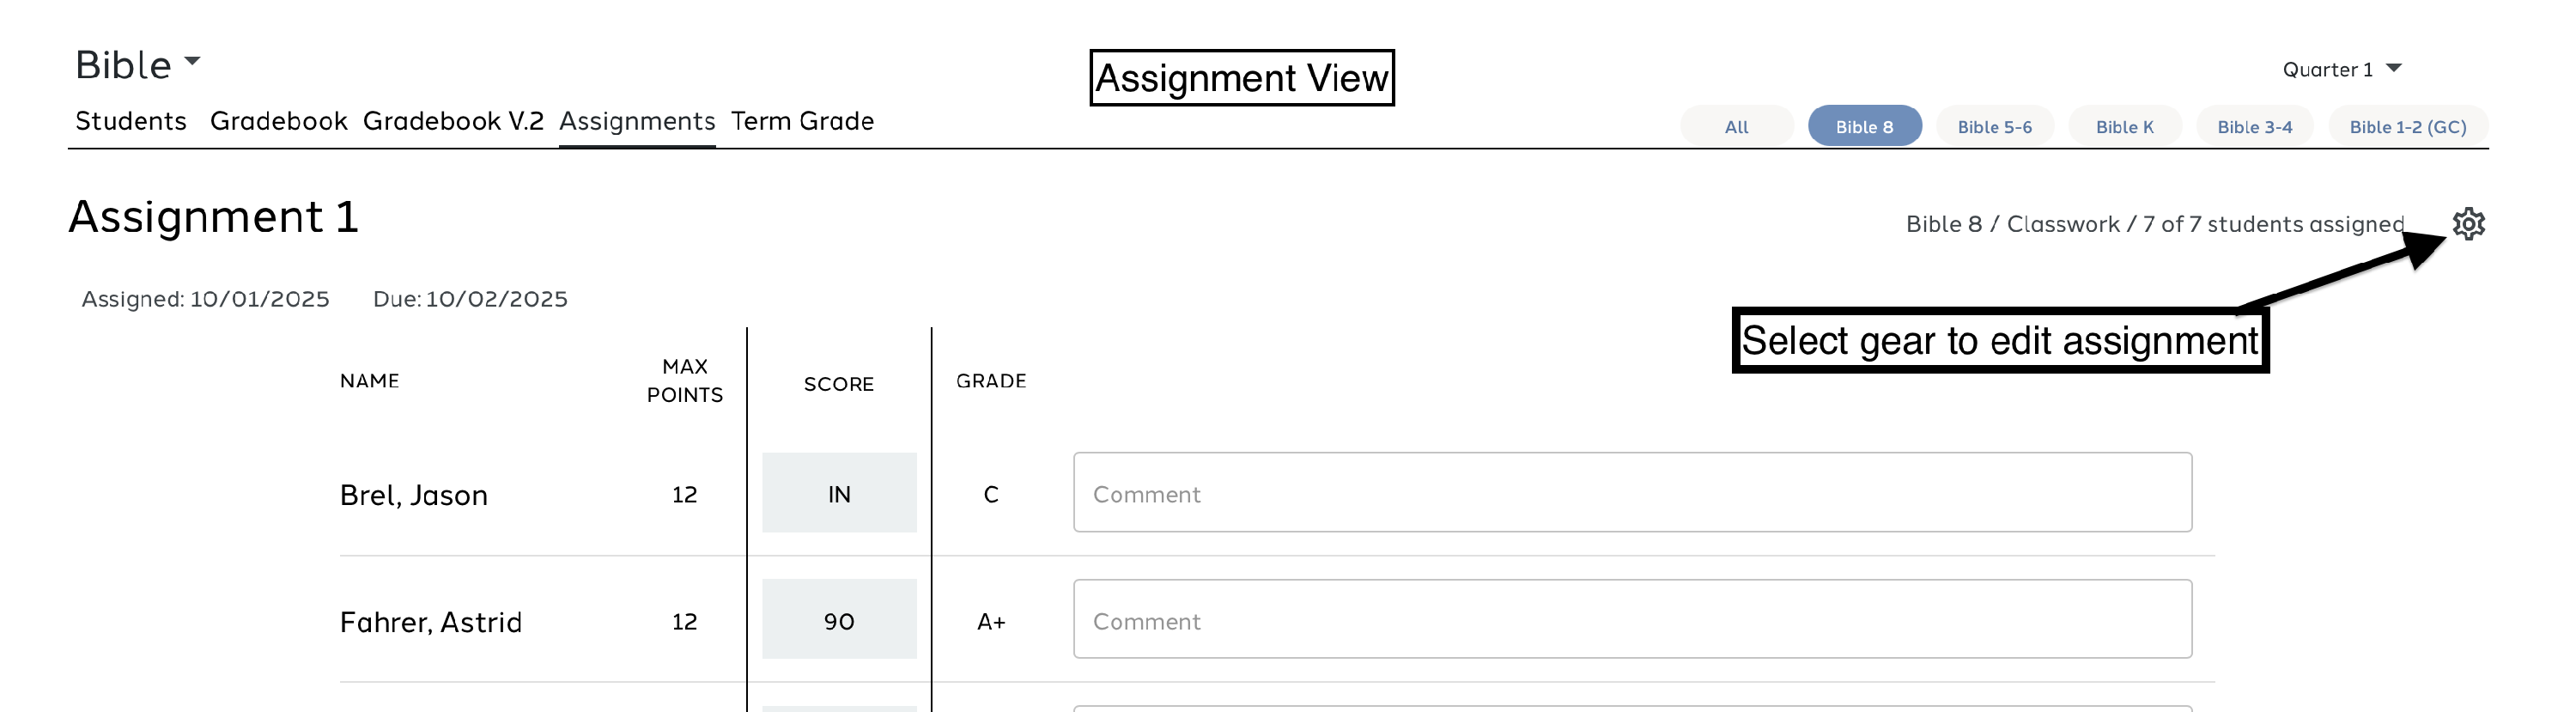
Editing from the Assignment Screen
Use the three dots to the right of the assignment and select Edit Assignment.

Editing from a Class
- Navigate to Subjects or Classes.
- Select the class containing the assignment.
- Go to the Assignment tab.
- Use the three dots or gear icon to edit the assignment.

6. Add/Remove Student from Assignments
Users can add or remove students on an assignment if:
- The assignment does not apply to all students, or
- A student enrolled after the assignment was created.
To modify student assignments:
- Edit the assignment.
- Scroll to the Student List.
- Check or uncheck students to add or remove them.
- Save the assignment.
Students added to a class after an assignment is created are not automatically added and must be added manually.

7. Special Marks
Special Marks can be used to grade assignments.
Values are set per school in the School Profile.
Default Special Marks:
| Code | Meaning | Default Value | Note |
|---|---|---|---|
| ex | Excused- | No value | Code will show as excused on portals |
| IN | Incomplete | School-defined |
|
| √+ | Good Job | 100 |
|
| √ | Progressing | 70 |
|
| √- | Developing | 50 |
|
| / | Missing | No default (schools may assign a value, typically 0) | Code will display as missing on reports and portals. |
| AB | Absent | No default (schools may assign a value, typically 0) |
|
| SUS | Suspended | 0 |
|
| Rec | Received | No value | Code will display as Received in portals |
For more details, see the Special Marks Guide.
8. Missing Assignments
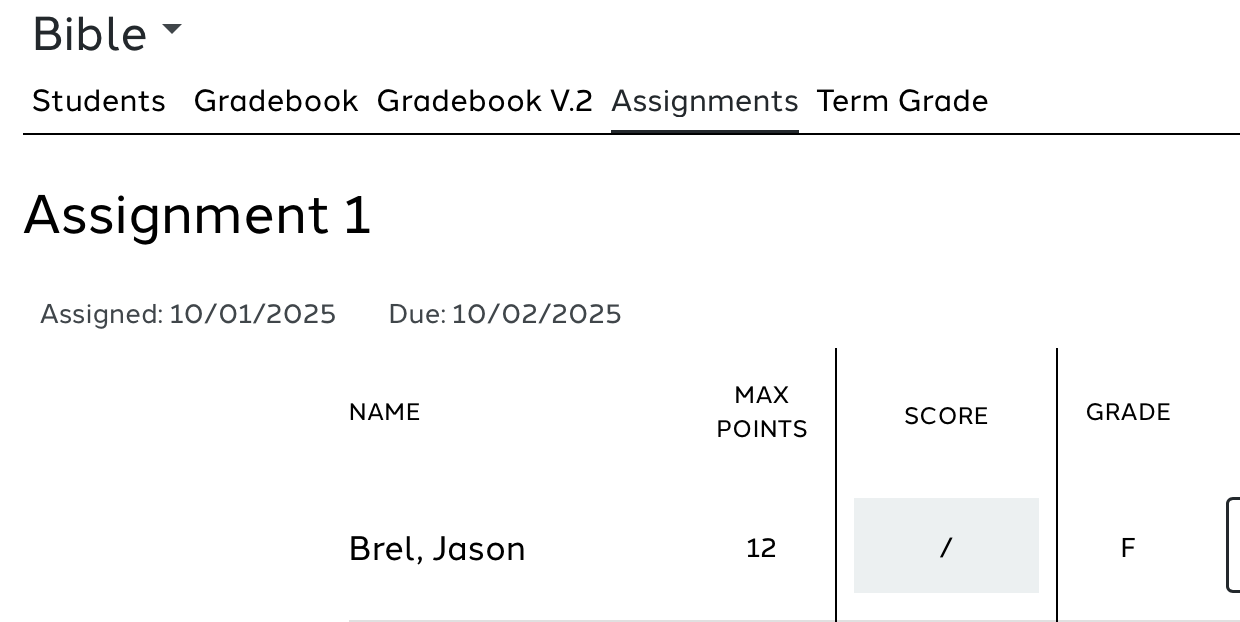
The / mark is used to indicate Missing.
Schools may assign a value to Missing. Missing status is defined per school.
When the / mark is entered:
- The assignment displays as Missing on:
- Assignment Report
- Missing Assignment Report
- Student & Parent Portal
- Student Progress Reports
See the Missing Assignment Report Guide for more information.
9. Duplicate Assignment to Class
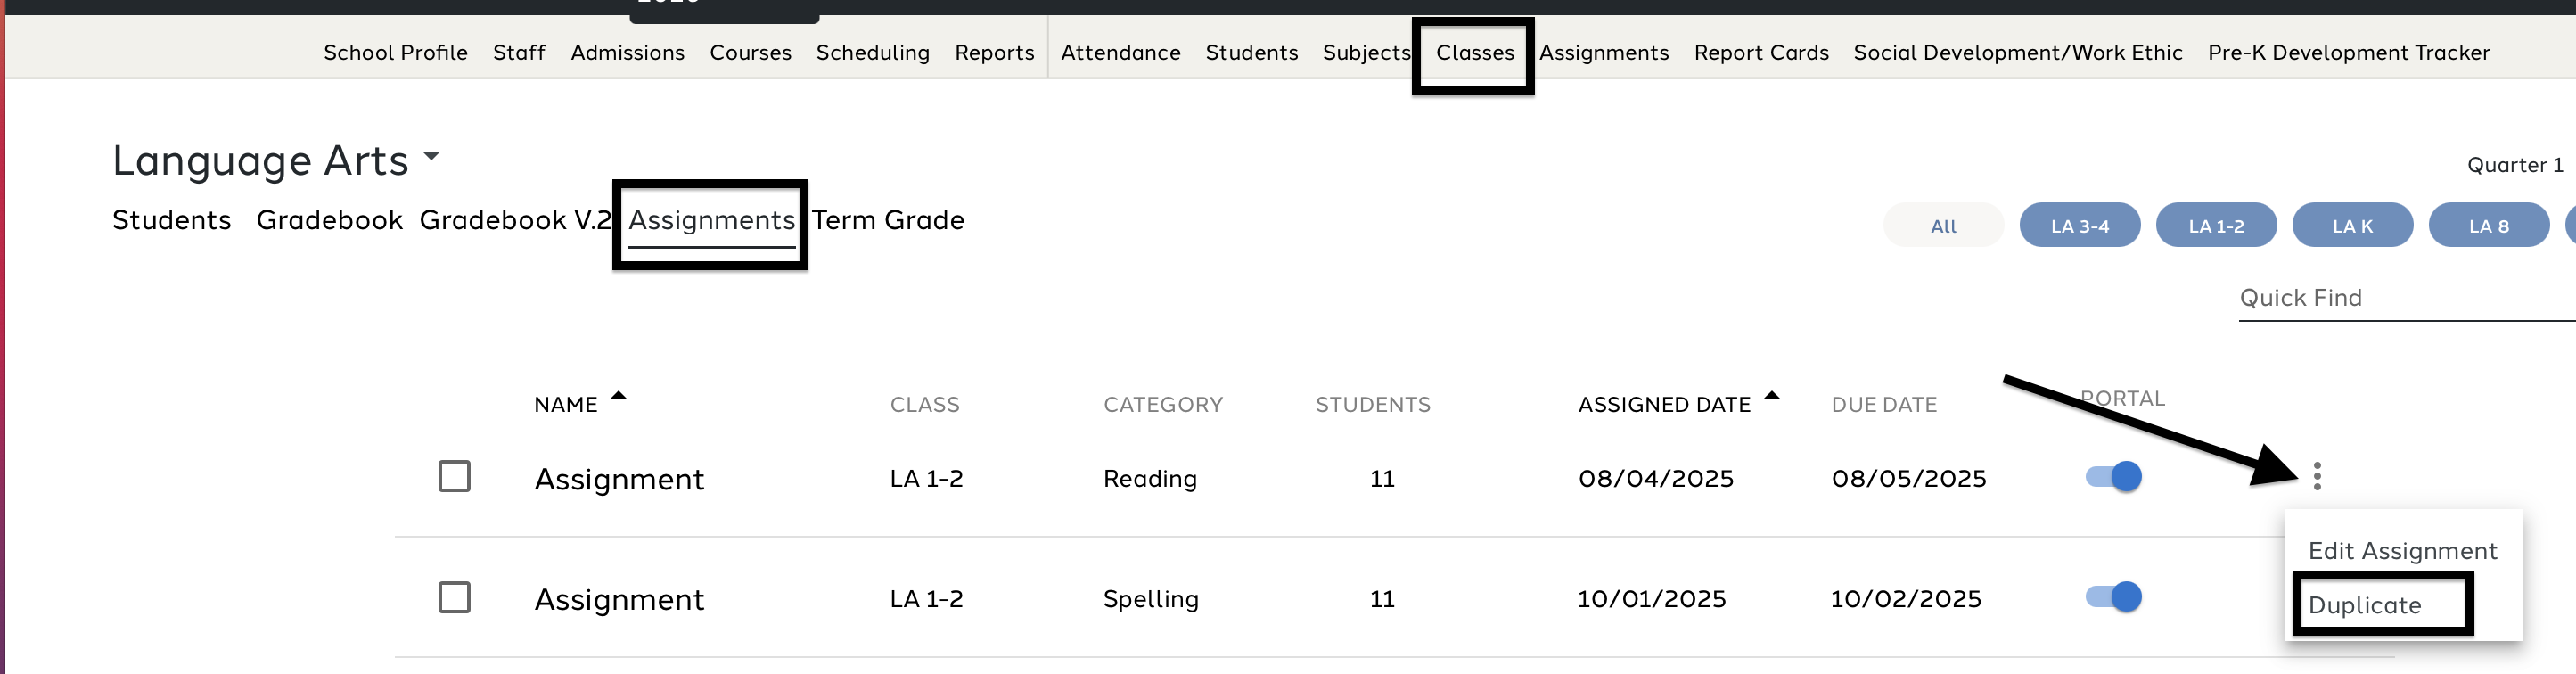
Assignments can be duplicated from:
- The Assignment tab
- The Assignments list within each class
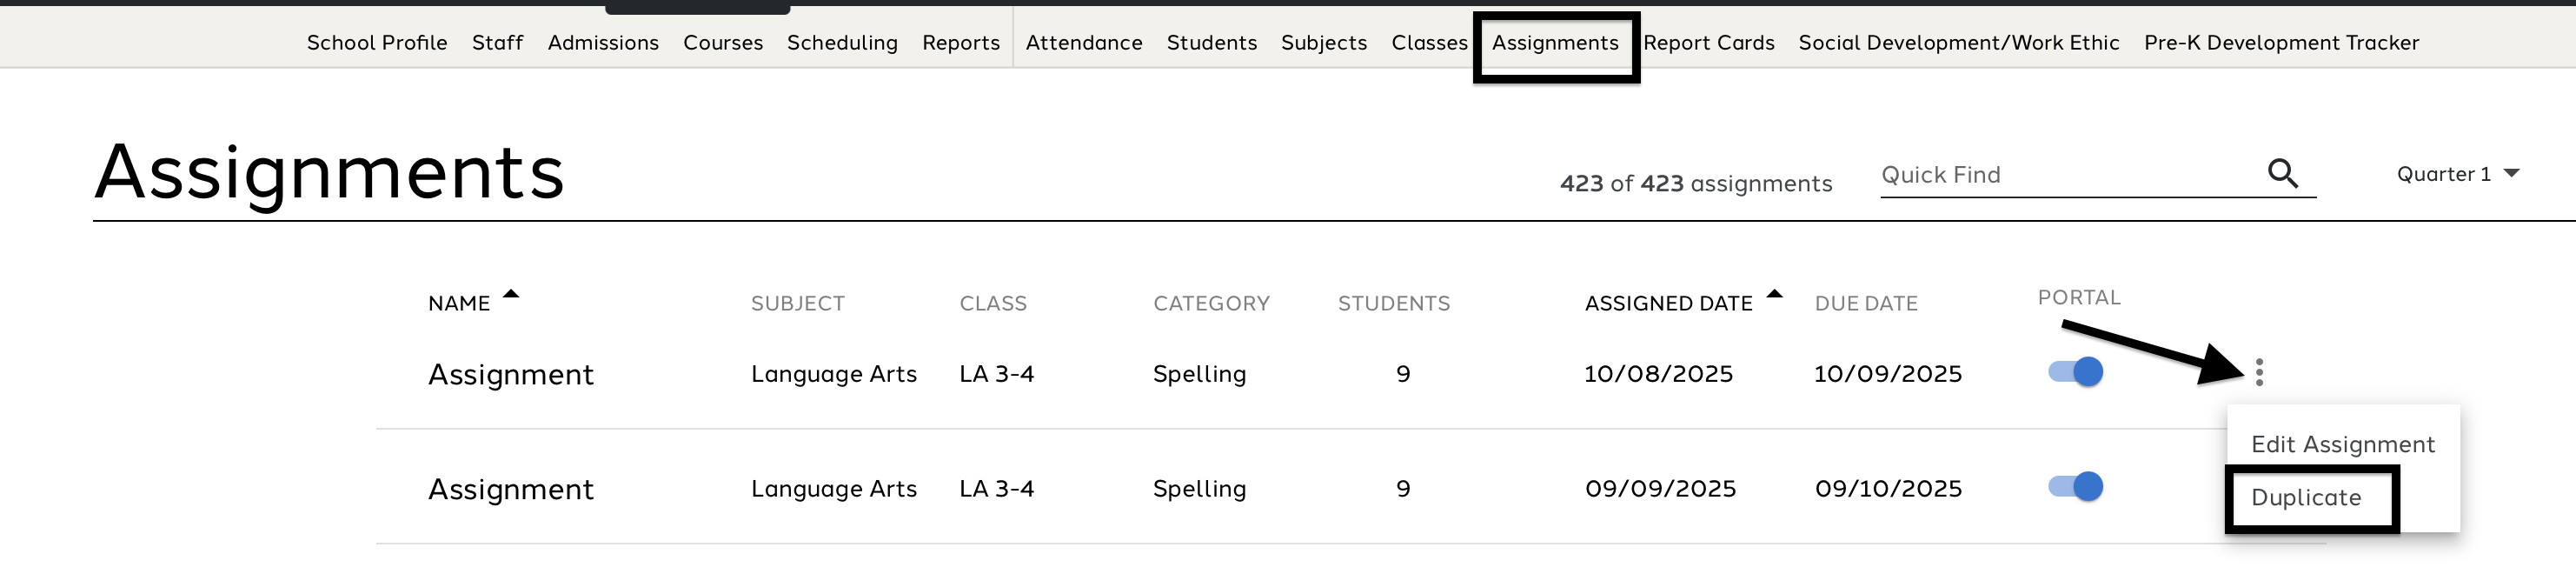
To duplicate:
- Navigate to the Assignment list.
- Select the three dots next to the assignment.
- Choose Duplicate Assignment.
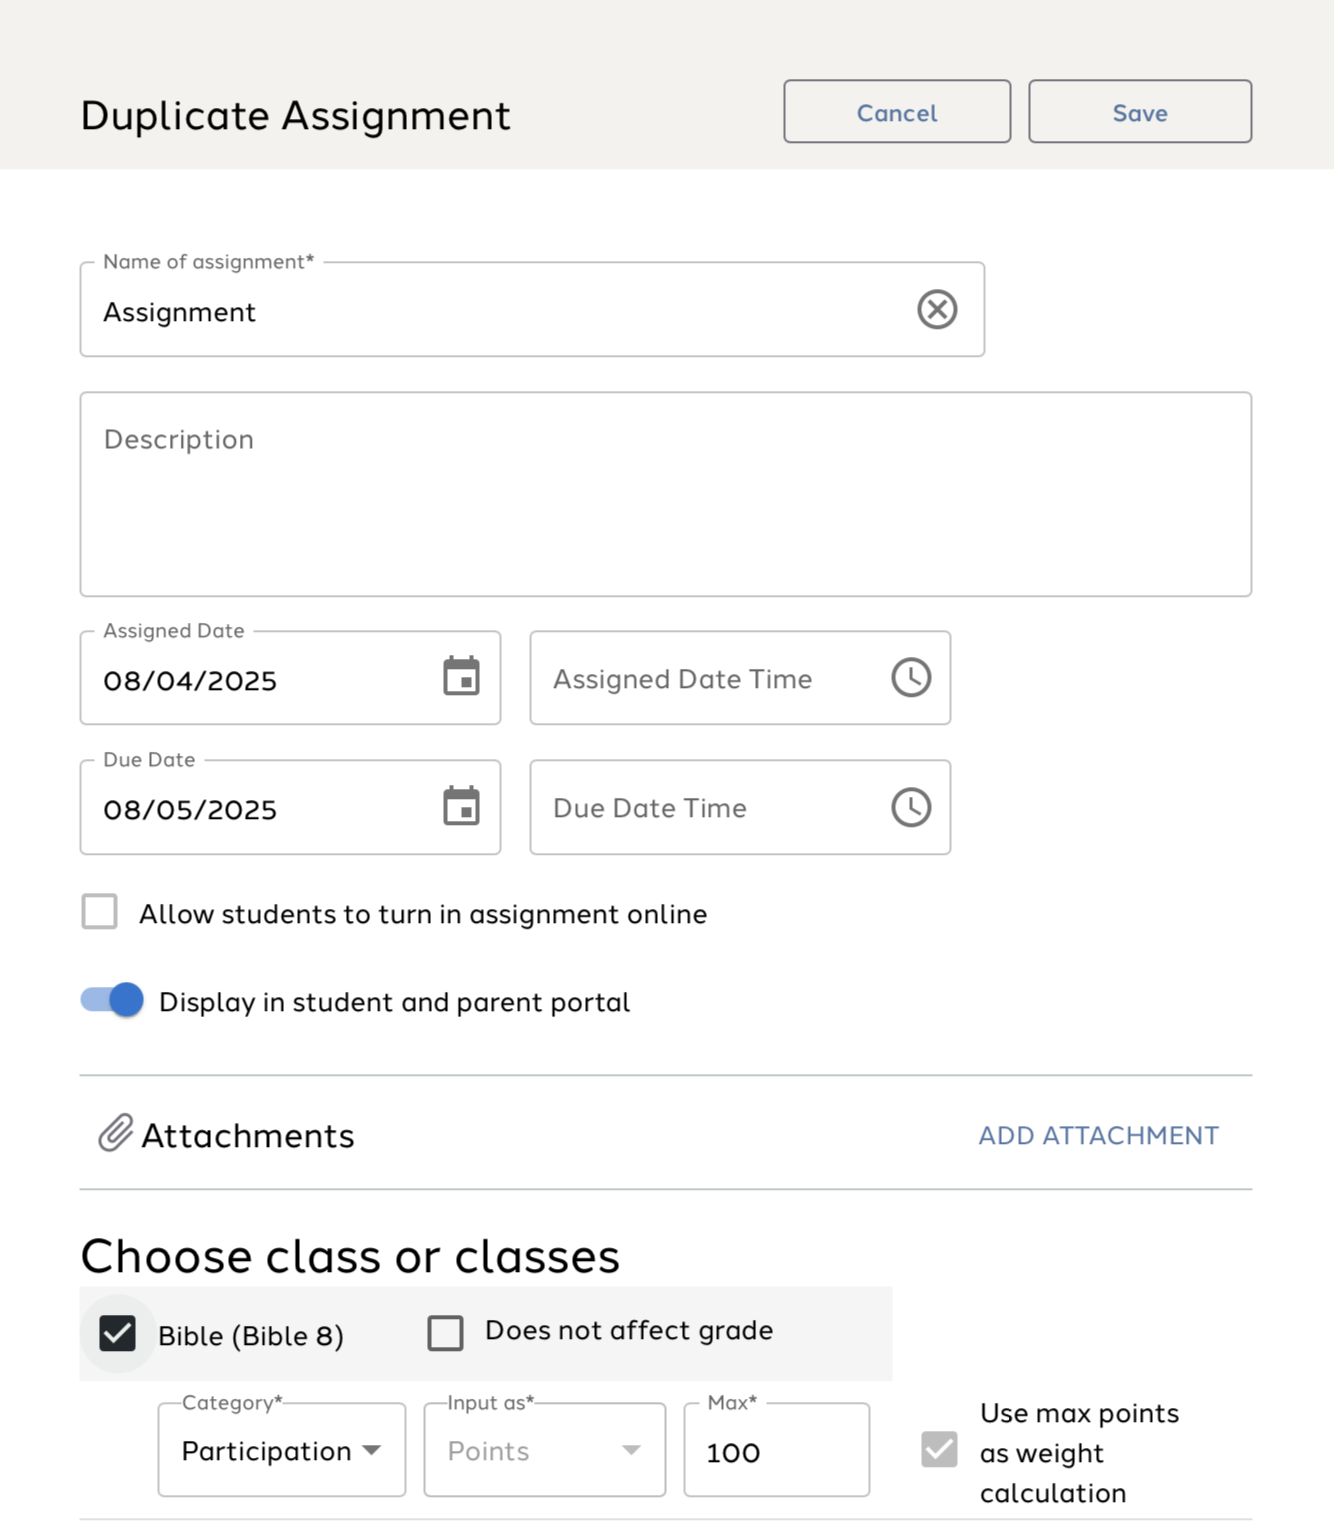
- Update any assignment properties.
- Select the classes to receive the duplicated assignment.
- Save.
10. Delete Assignment (s)
IMPORTANT: Once an assignment is delete is cannot be retrieved. It is gone forever!
Assignments may be deleted:
- Individually (from the Assignment or Subject screen)
- In bulk (mass delete from the Subject screen)
Deleting a Single Assignment
- Open Assignments from the main menu.
- Use the three dots → Edit Assignment.
- Select Delete.

Deleting Multiple Assignments
- Navigate to the class.
- Select Assignments from the class menu.
- Check the assignments to be deleted.
- Choose Delete Assignment from the Action menu.
- Type delete in the confirmation modal.